If you are like me, you hate developing on Linux. Nothing beats Microsoft’s Visual Studio, nothing. Recently with the Windows 10 Anniversary update you have WSL or Windows Subsystem for Linux, as excited as I was for this to come out Visual Studio is a “slow” adopter of this technology and I currently spent many hours poking and tweaking things until I got them right. So here it is, a full tutorial on how to get PlayStation 4 development going on Windows.
Note: This is not using any of Sony’s official software development kit, and is free for anyone to use.
Before I begin, I would like to personally thank Marc Goodner and the Visual Studio C++ for Linux development team. Without them and the WSL team none of this would have been possible. At the time of this writing you will need the 1.0.5 or higher VS C++ for Linux which has not been released yet but a preview build is available for download from Microsoft.
You will need the Windows 10 Anniversary Update, if you are unsure if you have the right version you can check by opening up a command prompt and typing “ver” it should echo back “Microsoft Windows [Version 10.0.14393]” or higher.
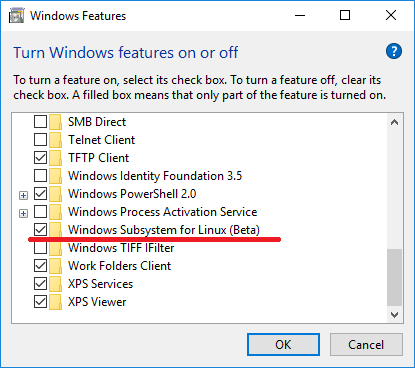
 Open up the Start menu and type “Turn Windows Features” and it should show up.
Click on that and scroll down until you see “Windows Subsystem for Linux (Beta)” and check the box and click OK. It will install some stuff and you should get a “Bash on Ubuntu On Windows” in your start menu. Or from Run enter “bash”. It will ask you to accept the terms and install Ubuntu from Canonical. Let that do it’s business and when it finishes open up bash.
At the time of this writing Bash on Windows is based off of Ubuntu 14.04 LTS. Microsoft stated that eventually an update will be pushed and it will be based off of 16.04 LTS but it hasn’t happened yet.
Looking at Clang/LLVM’s website you can figure out which version of clang that you need to install based on distribution. In order to build for the PS4 you will need clang-3.8 or higher and instead of compiling that by hand (which takes forever).
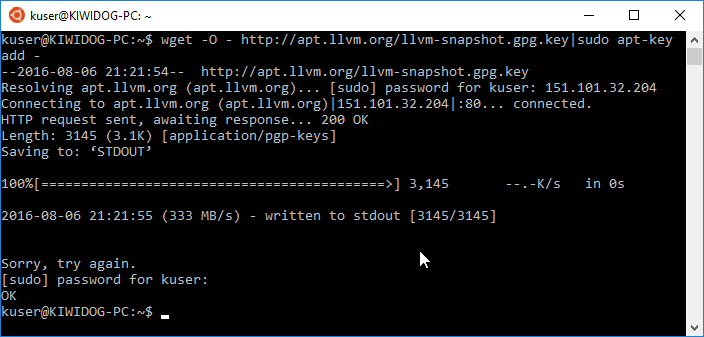
Type in “wget -O – http://apt.llvm.org/llvm-snapshot.gpg.key|sudo apt-key add -” and it should download the gpg key and add the key successfully.
Then type in “apt-get install clang-3.8 lldb-3.8” and let it in install. You can verify that it installed properly by typing “clang++-3.8
Technically at this point you can use clang++-3.8 and compile using the clang flag “-target x86_64-scei-ps4” but let’s go a bit further and actually get this working in Visual Studio. Until native WSL support gets added you will need to install ssh on your machine but it won’t run out of the box properly due to certain features being unimplemented at this time.
Special thanks to the instructions provided on the BashOnWindows issue tracker and aseering for the instructions on how to get ssh running properly.
- Type “sudo apt-get install openssh-server”
- Generate SSH host keys by running “sudo dpkg-reconfigure openssh-server” in a bash shell
- Run “sudo nano /etc/ssh/sshd_config”; edit the “UsePrivilegeSeparation yes” line to read “UsePrivilegeSeparation no”. (This is necessary because “UsePrivilegeSeparation” uses the “chroot()” syscall, which WSL doesn’t currently support.)
- While still editing “/etc/ssh/sshd_config”, you may choose to change “PasswordAuthentication no” to “PasswordAuthentication yes”. Otherwise you will have to set up SSH keys.
- Save “/etc/ssh/sshd_config” and exit.
- Run “sudo visudo” to edit the sudoers file. Add the line “$USER ALL = (root) NOPASSWD: /usr/sbin/sshd -D”, replacing “$USER” with your Linux username. Save and exit. If visudo complains that your changes are invalid, fix them until it reports that they are valid; otherwise you can break sudo on your system!
- On the Windows side, edit the Windows firewall (and any third-party firewalls that you might be running) to allow incoming traffic on port 22. Because this isn’t a super-secure setup, I recommend only allowing incoming traffic from home (private) and domain networks, not from the public Internet.
- Create a text file “StartSSH.vbs” in Windows containing the following:
set ws=wscript.createobject("wscript.shell")

ws.run "C:\Windows\System32\bash.exe -c 'sudo /usr/sbin/sshd -D'",0
- Double-click on the script. It should start sshd; you should be able to ssh into your Windows machine. Verify this by checking that bash.exe with sshd is running.
You may have to do a netstat -a -n if it doesn’t launch which means something is normally already using port 22. If so just kill that process and repeat the last step to launch ssh properly.
Update: If you are getting issues where ssh will not start, within the bash shell (only have to do this once) type “sudo nano /etc/ssh/sshd_config” and change the Port number from 22 to 2222, and you will need to adjust your firewall and C++ for Linux configuration accordingly.
Once this has been done, you should be all ready and set to setup the Visual Studio C++ plugin.
Step 3: Configuring Visual C++ for Linux development plugin
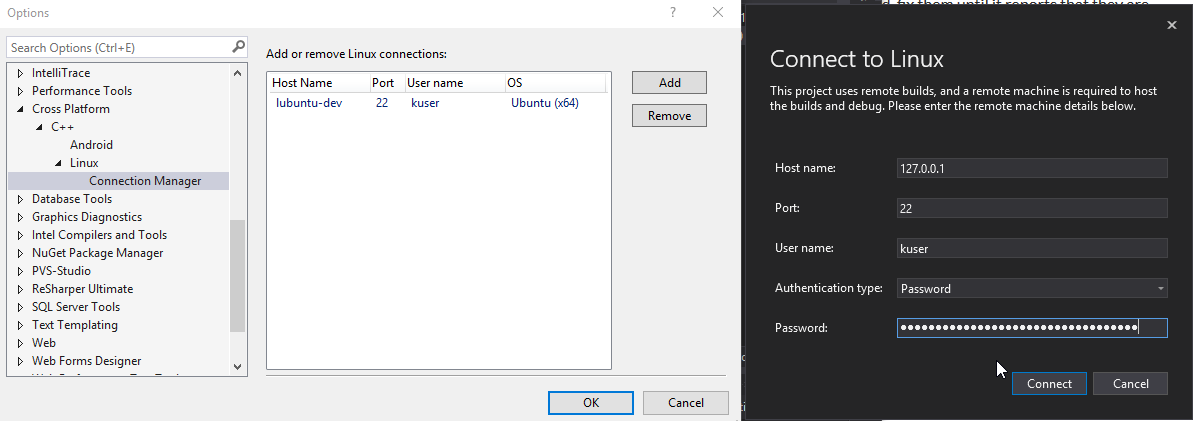
In Visual Studio 2015 after you have finished installing the plugin and creating a project you will have to add your “remote build machine”. You can find this by going to Tools->Options->Cross-Platform->C++->Linux->Connection Manager.
Click on Add then add for the hostname “127.0.0.1”, for some reason using “localhost” is blocked. Probably to make it a bit more idiot proof as Windows isn’t really Linux and this plugin was out before WSL was released.
Click on “Connect” and “OK” and you should be all set to start building for Linux in general, which this is a HUGE step in having more people target Linux as well as Windows with very little issue. (I’m writing an article also on the state of gaming on Linux and what needs to be done)
Step 4: Configuring your Visual Studio Linux project.
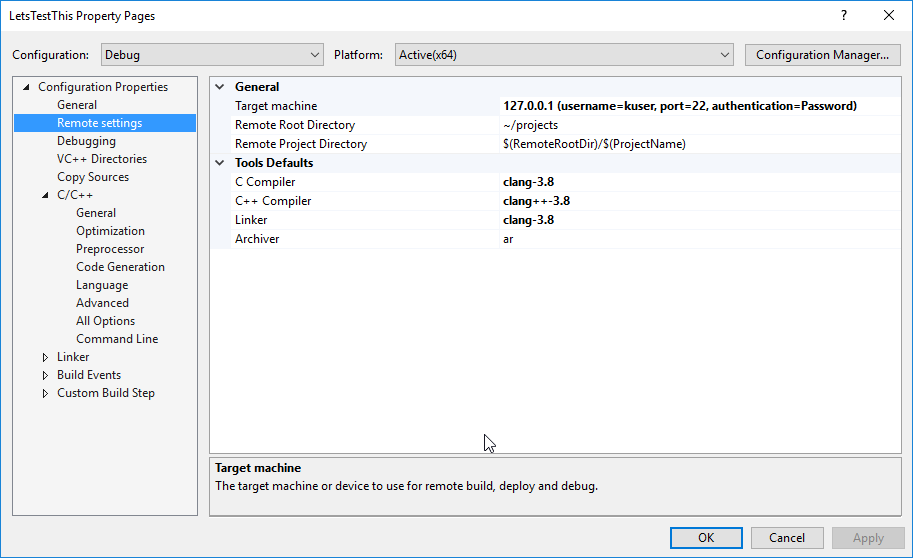
The only thing you really need to get started with PlayStation 4 development are a few settings changed. Right click on the project and go to properties.
Select your new Target Machine of 127.0.0.1 that you configured earlier. Set the C Compiler to “clang-3.8”, the C++ compiler to “clang++-3.8” and the Linker to “clang-3.8” and you should be all set on this page.
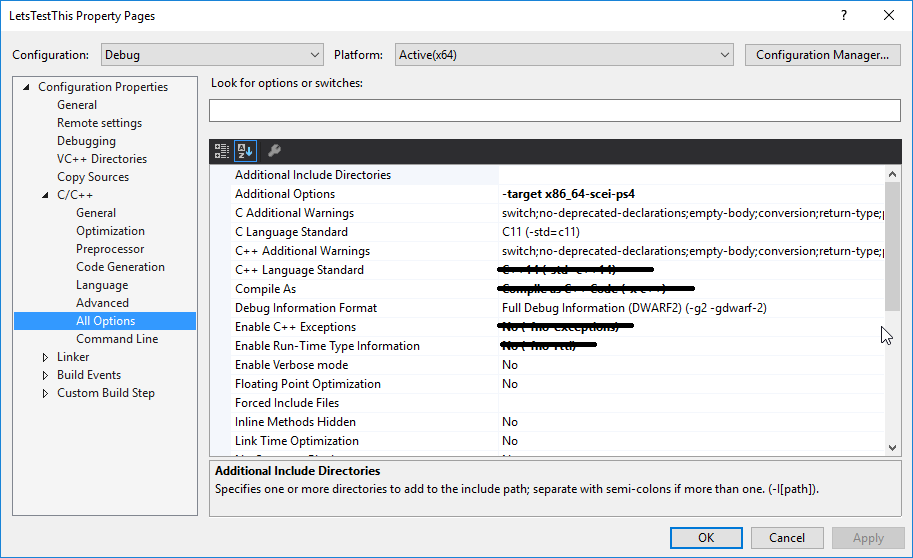
Next you will want to click on C/C++->All Options and enable pie or Position Independent Code. Then also for the Additional Compiler options add the clang triple of “-target x86_64-scei-ps4” to get all of the default settings for PS4 compilation. The rest of the settings are extra that I added for my personal project.
Add your source code, and CLICK THAT BUILD BUTTON!!!! You should get a proper .out file which is a valid ELF file that you can use!
